
You have read many articles on Hadoop and now you want to get familiar with it, but how do you install and apply this new technology? The recommended approach is to install a turnkey virtualized machine supplied by a major publisher.

Another more technical approach, is to install Hadoop itself on one machine to better understand what is behind the technology.
Big Data tutorial of the month
To help you explore this new technology, I wrote a tutorial that will allow you to take the plunge head first into Hadoop. Go!
Introduction and References
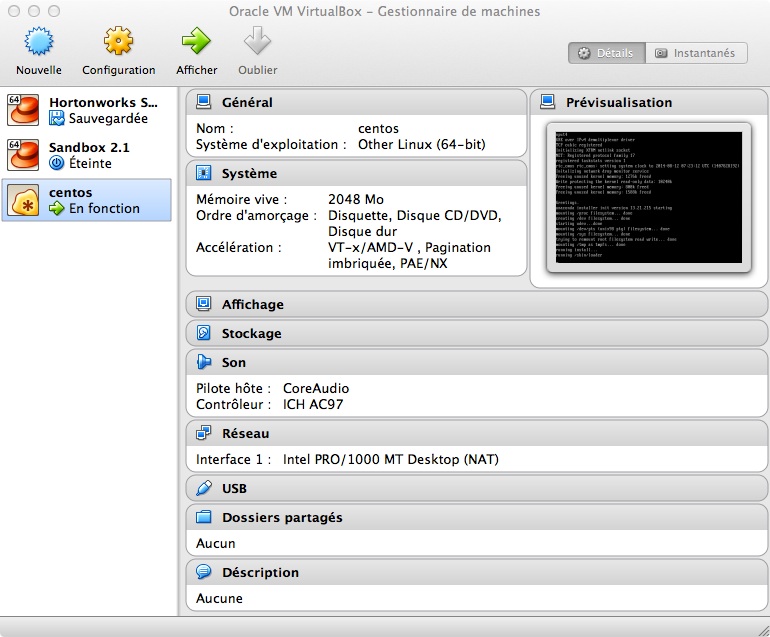
I have a Macbook Pro as Mavericks. For reasons of simplicity and to avoid disturbing my current job, I chose to run Hadoop on a virtualized machine with VirtualBox (version 4.3.10).
For the operating system, I retained Centos (version 6.5 64-bit) which is the free version of Red Hat. I chose the “minimum” version because I do not need a graphical interface, the administration and management of Hadoop will be in fashion “remote” from my host machine know my mac.
This tutorial was largely inspired by an excellent article by Michael Noll and Apache documentation.
Network Settings
We want the guest machine (Centos) to be able to access the net to simplify Linux package installation while being accessible by the host machine (OSX) in remote mode. We also want to access the web interface and utilize the various services offered by native Hadoop.
To do so, we will configure NAT virtual network at our virtual machine.
Like a physical machine, a NAT network provides an IP address translation between the external address and the address of the machine. This makes the machine no longer accessible from the outside, and thus provides better security.
In our case, it’s a little annoying because the guest server will not be visible to the host. Fortunately, we can work around this problem by redirecting ports.
This parameter is at the network configuration of the virtual machine.
We will indicate to the host machine (127.0.0.1) that all streams on port 2222 will be redirected to port 22 (the default ssh port) of our guest machine.
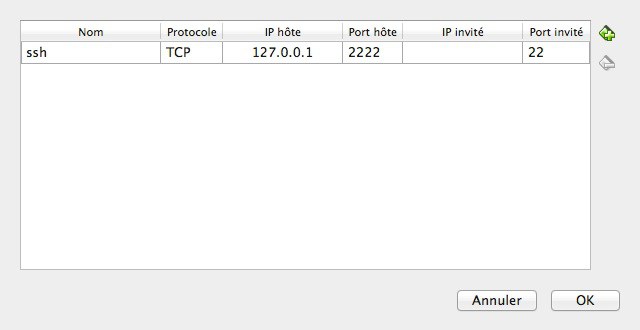
This way, we have a guest machine that can access the external network and can communicate with the host machine via these redirects on specific ports.
Once installed Centos, we will be able to handle the connection from the host machine.
Continue this tutorial with the setting of the host machine.
Setting access from the host machine
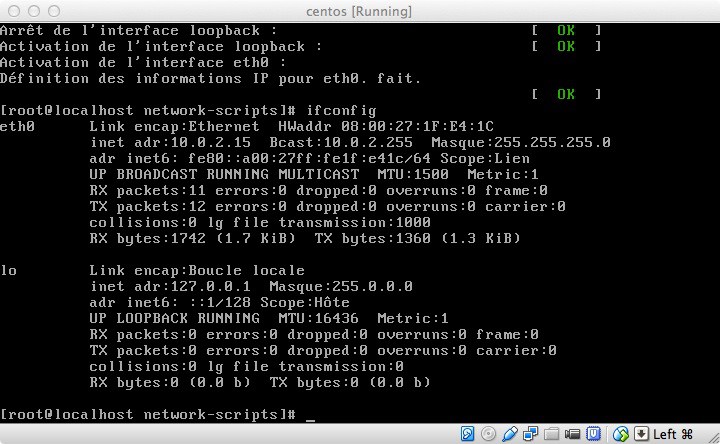
Port 2222 has already redirected but it is not enough. The “minimal” install Centos is really minimal. The interface eth0 is not installed by default.
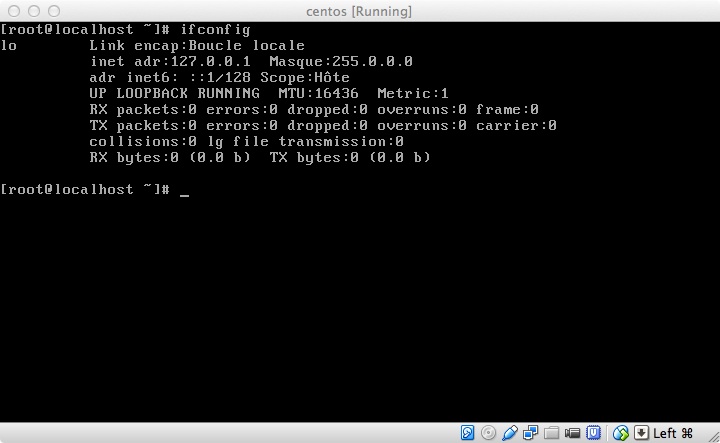
The ifconfig command shows that only the local loop is active.
We will modify the configuration file:
vi / etc / sysconfig / network-scripts / ifcfg-eth0
Then you will need to switch ONBOOT to yes.
Make sure to back up at this point. Then restart the services with the command:
Service network restart
ifconfig to check:
So now I can connect to Terminal from Mac to access my Centos machine.
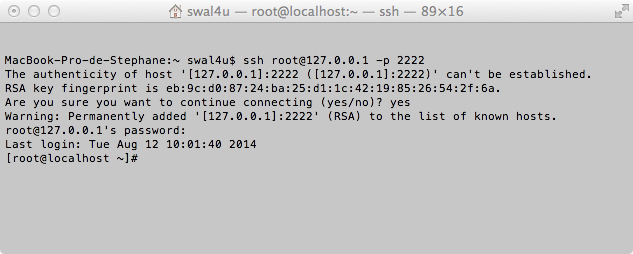
If the connection is refused, it may be because the ip address 127.0.0.1 is perhaps already associated with a different RSA key corresponding to a different server.
The easiest way is to delete the file on the host storing the keys with the command:
rm /Users/userx/.ssh/known_hosts (adapt according to your host)
Configuring ssh centos
Hadoop requires SSH to run.
It installs the SSH client tools on Centos machine.
yum install openssh-clients
Then we create a group “hadoop”.
groupadd hadoop
Then we create our “hduser” user.
useradd -g hadoop hduser
We will then log in as hduser and generate the public key of the user that will authenticate seamlessly without having to re-enter their password.
su - hduser
ssh-keygen -t rsa -P '"
cat $ HOME / .ssh / id_rsa.pub >> $ HOME / .ssh / authorized_keys
Disabling IPV6
IPV6 is problematic. It is recommended to disable it.
To do this we will have to modify the sysctl.conf file.
vi /etc/sysctl.conf
Add these lines at end of document:
# Ipv6 disable
net.ipv6.conf.all.disable_ipv6
net.ipv6.conf.default.disable_ipv6 = 1 = 1 = 1
net.ipv6.conf.lo.disable_ipv6
Setting the time
If there’s one thing I find difficult in VirtualBox, it is my VM never has the default time, which is not the case under VmWare. Fortunately, there is a solution. (Note: I did not have to set the time while testing the tutorial on Yosemite and the latest version of VirtualBox).
We can start by setting the system date with the command:
Date -s HH: MM
The problem is that every time, the time goes awry.
What you actually want is the time of the guest dock on the host hour.
To do this, simply run the following command:
sudo hwclock -hctosys
Then turn off the VM:
Run on the host the following command.
VBoxManage modifyvm -biossystemtimeoffset -0
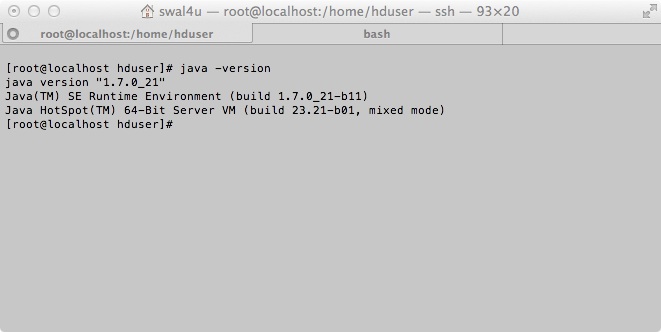
Java installation
I retained the version 1.7.0_21 oracle.
It downloads the rpm file on the Oracle website: jdk-7u21-linux-x64.rpm.
Then it is transferred on centos.
scp -P 2222 jdk * root@127.0.0.1: / usr / local
And then settled with the following command:
rpm -Uvh jdk-7u21-linux-x64.rpm
And now java is installed.
One can check the installation with the command:
java –version
Installing Hadoop
Download Apache Hadoop on the site.
Then copy it to / usr / local.
We will then unpack the archive:
cd / usr / local
tar xvf hadoop-2.4.1.tar
We rename the directory for simplicity:
mv hadoop hadoop-2.4.1
It then assigns the rights to our hduser user:
chown -R hduser: hadoop hadoop
Setting .bashrc (hduser)
Add the following lines to the end fu $ HOME / .bashrc.
# Set Hadoop-related environment variables
Export HADOOP_HOME = / usr / local / hadoop
# Set JAVA_HOME (We Will aussi Directly sets JAVA_HOME for Hadoop later on)
export JAVA_HOME = / usr / java / latest
# Some convenient aliases and functions for running Hadoop-related commands
unalias fs &> / dev / null
alias fs = "hadoop fs"
#unalias hls &> / dev / null
alias hl = "fs -ls"
# If you-have LZO compression enabled in your Hadoop cluster and
# Compress job outputs with lzop (not covered in this tutorial):
Conveniently # inspect year lzop compressed file from the command
# Line; run via:
#
# $ Lzohead /hdfs/path/to/lzop/compressed/file.lzo
#
# Requires installed 'lzop' command.
#
#lzohead () {
# Hadoop fs -cat $ 1 | lzop -dc | head -1000 | less
#}
# Add Hadoop bin / directory to PATH
export PATH = $ PATH: $ HADOOP_HOME / bin
Reboot the machine
Finalization of Hadoop setup
Create a temporary directory for Hadoop.
mkdir -p / app / hadoop / tmp
hduser chown: hadoop / app / hadoop / tmp
chmod 750 / app / hadoop / tmp
Setup files are located at the following location: / usr / local / hadoop / etc / hadoop.
Core-site.xml setting
Copy the following lines between the configurations tags.
<property>
<name>hadoop.tmp.dir</name>
<value>/app/hadoop/tmp</value>
<description>A base for other temporary directories.</description>
</property>
<property>
<name>fs.default.name</name>
<value>hdfs://localhost:9000</value>
<description>The name of the default file system. A URI whose scheme and authority determine the FileSystem implementation. The uri's scheme determines the config property (fs.SCHEME.impl) naming the FileSystem implementation class. The uri's authority is used to determine the host, port, etc. for a filesystem.</description>
</property>
HDFS-site.xml setting
Copy the following lines between the configurations tags.
<property>
<name>dfs.replication</name>
<value>1</value>
<description>Default block replication. The actual number of replications can be specified when the file is created. The default is used if replication is not specified in create time. </description>
</property>
The actual number of replications Can Be When The specified file is created.
The default is used if replication is not specified in create time.
Mapred-site.xml setting
First: cp mapred-site.xml.template mapred-site.xml.
Then copy the following lines between the configurations tags.
<property>
<name>mapred.job.tracker</name>
<value>localhost:9001</value>
</property>
Formatting NameNode
Under hduser:
hadoop NameNode –format
Hadoop startup
 cd /usr/local/hadoop
 sbin/start-dfs.sh
Firewall setting
The firewall is enabled by default on centos. We will release it to test the connection via the http interface.
service iptables stop
Verifying the Installation
You can now access the Hadoop web interface from the host machine 127.0.0.1:50070.
Thank you for reading this tutorial!


Your email address is only used by Business & Decision, the controller, to process your request and to send any Business & Decision communication related to your request only. Learn more about managing your data and your rights.